Working with Amazon Elastic Container Service
Amazon Elastic Container Service (Amazon ECS) is a highly scalable, fast, container management service that makes it easy to run, stop, and manage Docker containers on a cluster of Amazon EC2 instances.
This tutorial leads you through the steps to:
- Create a Task Definition, a description of an application that contains one or more Docker containers.
- Create a Cluster, a logical grouping of Amazon EC2 instances on which you can place tasks.
- Create a Service, that allows you to run and maintain a specified number of instances of a task definition simultaneously.
You needs to have Auto Scaling group of EC2 instances that you will use to populate the Cluster and an Elastic Load Balancer for use with your ECS Service.
By the end of this tutorial, you will be able to:
- Create an ECS Task Definition
- Populate an ECS Cluster
- Deploy an application to an ECS Service
- Deploy an application update by changing the Task Definition
- Scale up the application
What is Amazon Elastic Container Service?
Amazon Elastic Container Service (Amazon ECS) is a highly scalable, fast, container management service that makes it easy to run, stop, and manage Docker containers on a cluster of Amazon EC2 instances. Amazon ECS lets you launch and stop container-enabled applications with simple API calls, allows you to get the state of your cluster from a centralized service, and gives you access to many familiar Amazon EC2 features.
You can use Amazon ECS to schedule the placement of containers across your cluster based on your resource needs, isolation policies, and availability requirements. Amazon ECS eliminates the need for you to operate your own cluster management and configuration management systems or worry about scaling your management infrastructure.
COMPONENTS OF AMAZON ECS
Amazon ECS contains the following components:
- Container Instance: An Amazon EC2 instance that is running the Amazon ECS agent and has been registered into a cluster.
- Cluster: A logical grouping of container instances on which you can place tasks.
- Task Definition: A description of an application that contains one or more container definitions.
- Task: A single instantiation of a Task Definition.
- Scheduler: The method used for placing tasks on container instances.
- Amazon ECS service: Allows you to run and maintain a specified number of instances of a task definition simultaneously.
SCHEDULING AMAZON ECS TASKS
Amazon Elastic Container Service (Amazon ECS) is a shared state, optimistic concurrency system that provides flexible scheduling capabilities for your tasks and containers. The Amazon ECS schedulers leverage cluster state information provided by the Amazon ECS API to make an appropriate placement decision. Amazon ECS provides the service scheduler for long running stateless services and applications.
The service scheduler ensures that the specified number of tasks are constantly running and reschedules tasks when a task fails (for example, if the underlying container instance fails for some reason). The service scheduler optionally ensures that tasks are registered against a load balancer. You can update your services that are maintained by the service scheduler, such as deploying a new task definition, or changing the running number of desired tasks.
SERVICE DEFINITION PARAMETERS
A service definition defines which task definition to use with your service, how many instantiations of that task to run, and which load balancers (if any) to associate with your tasks.
SERVICE LOAD BALANCING
Your Amazon ECS service can optionally be configured to use Elastic Load Balancing to manage traffic.

Register A Task Definition With The amazon-ecs-sample Image
- In the AWS Management Console, on the Services menu, click ECS.
- In the left navigation pane, click Task Definitions.
- Click Create new Task Definition
- On the Select launch type compatibility page,
- Click EC2
- Click Next step
- Scroll to the bottom of the screen, then click Configure via JSON (This option allows you to load a Task Definition from a configuration file rather than manually creating the definition.)
- Delete the code in the JSON panel. (The following task definition JSON file specifies two containers that are pulled from the Docker Hub repository.)
- Copy and paste the following task definition into the JSON panel (https://gist.github.com/truongnhatbui/e8bcab67dc419680013015d14548972d)
- Click Save (You will notice that the configuration screen has been populated based upon the template.)
- Scroll to the botton of the screen, then click Create (This will register the Task Definition in the yourApp-demo family.)

Create a Service
In this tutorial you will create a service definition.
- In the left navigation pane, Click Clusters. (Make sure you have already an ECS Cluster).
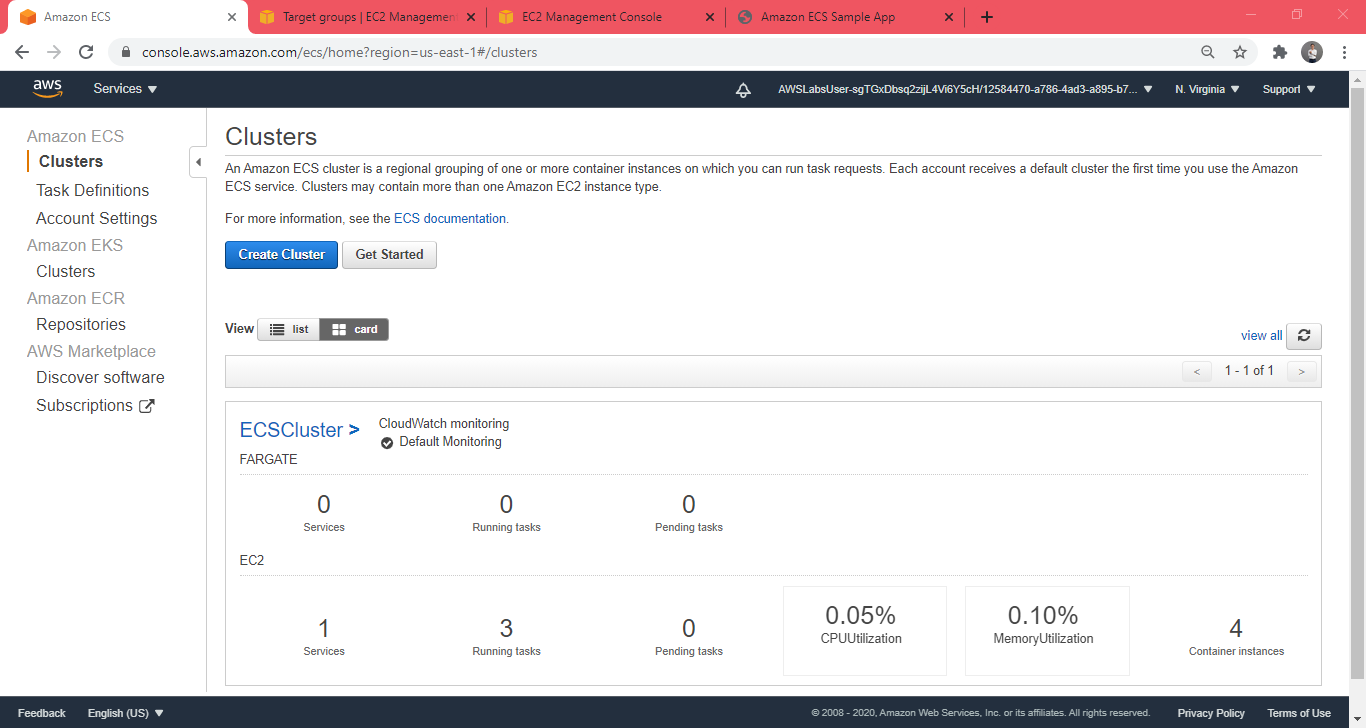
- Click ECSCluster >.
- On the Services tab, click Create then configure:
- Launch type: EC2
- Service name: myServiceNUMBER
- Replace NUMBER with a random number
- Number of tasks: 1 (This is the number of tasks that will be launched and maintained on your cluster.)
- Scroll to the bottom of the screen, then click Next step
- In the Load balancing section, configure:
- Load balancer type: Network Load Balancer
- Service IAM role: ecsServiceRole. (This role allows Amazon ECS to register and deregister container instances on the load balancer as tasks are placed on them.)
- Click Add to load balancer then configure:
- Production listener port: 80:TCP
- Target group name: myTargetGroup
- Scroll to the bottom of the screen, then click Next step
- For Set Auto Scaling (optional), click Next step
- Review your information, then click Create Service
- Click View Service (Details of the service you just created will be displayed.)
- Click refresh every 30 seconds until the status for each task displays as RUNNING.
- Click the Events tab. (This shows the progress of the various tasks associated with your service creation request.)
- Click the Refresh button till you get an event indicating that your service has reached a steady state. (This may take anywhere from 3-5 minutes.)
- Click Details tab.
- In the Details tab, click the Target Group Name.
- myTargetGroup should be selected.
- Click the Targets tab. In the Targets tab, you can see all of the registered targets.


- Under Basic configuration, click on MyLoadBalancer
- Under the Description, copy the DNS name of your load balancer to your clipboard.

- Open a new browser tab, then:
- Paste the load balancer DNS name
- Press Enter (If everything has been configured correctly you will see the sample app displayed as shown here:)

Deploy a New Application Version to the Service
Whenever you update the Docker image of an application, you can create a new task definition with that image and deploy it to your service, one task at a time. The service scheduler creates a task with the new task definition (provided there is an available container instance to place it on), and after it reaches the RUNNING state, a task that is using the old task definition is drained and stopped. This process continues until all of the desired tasks in your service are using the new task definition.
Keep the sample application browser tab open – you will use it again later.
- In the AWS Management Console, on the Services menu, click ECS.
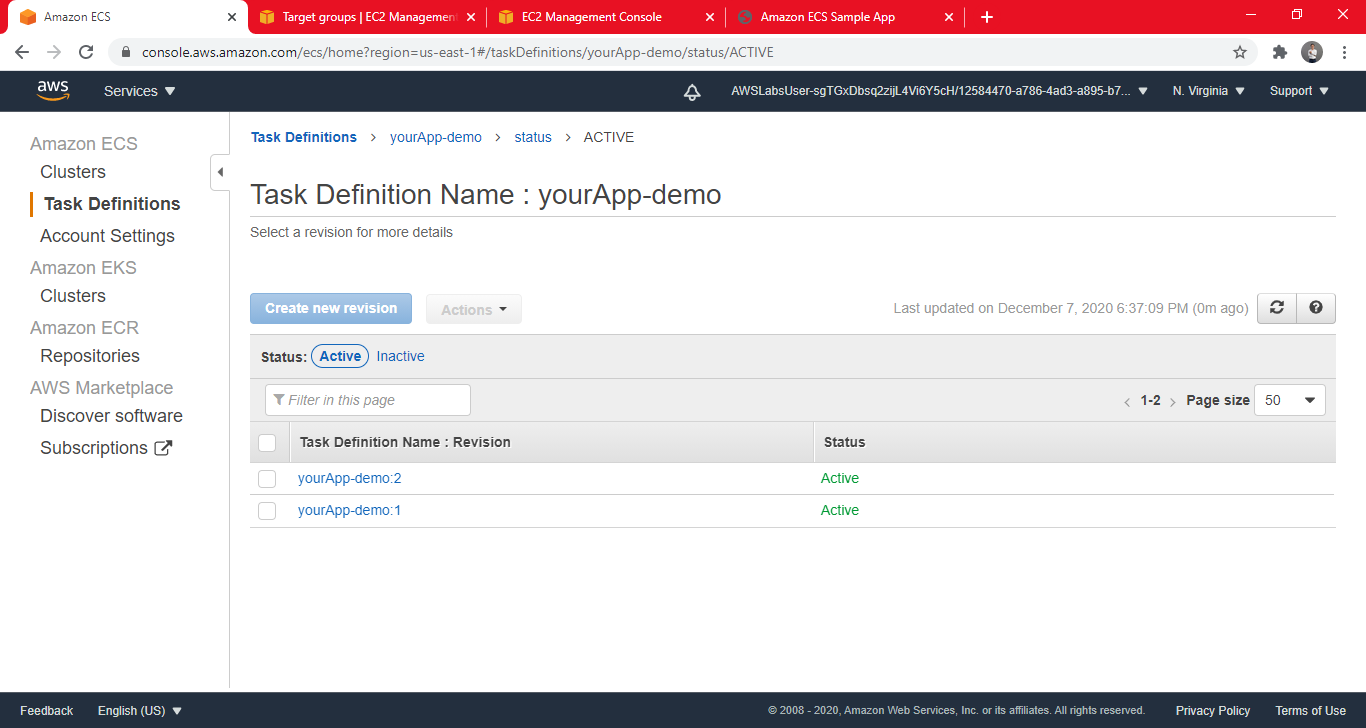
- In the left navigation pane, click Task Definitions.
- Select yourApp-demo.
- Click Create new revision
- Scroll to the bottom of the screen, then click Configure via JSON
- Delete the code in the JSON pane.
- Copy and paste the code updated task definition below into the JSON pane (https://gist.github.com/truongnhatbui/e8bcab67dc419680013015d14548972d)
- Click Save
- Click Create (This will change the message displayed from Congratulations! to Thank you!. In a production environment, you would likely change other aspects of your task definition.)
- In the left navigation pane, click Clusters.
- Click ECSCluster >.
- On the Services tab, select myService.
- Click Update then configure:
- Revision: Select the latest revision
- Click Next Step
- On Step 2 (visible on the left side), click Next step
- On Step 3, click Next step
- Click Update Service
- Click View Service (This will deploy a new version of the application.)
- Click the Events tab.
- Monitor the process of draining connections and stopping tasks.
- You can refresh the events by clicking refresh .
- You might see the message: service myService was unable to place a task because no container instance met all of its requirements.
- Because there are only four instances available this is the expected behavior. The system needs to stop the task on each instance before it can start a new one on each instance.
- Continue to refresh occasionally until you see service myService has reached a steady state at the top of the Event list.
- Click the Deployments tab. (The Running Count should be the same as the Desired count.)
- Return to your web browser and refresh the Load Balancer’s URL (DNS name).
- You should see the new version of the app that says Thank You!
Update a Running Service
You can update a running service to change the number of tasks that are maintained by the service or which task definition is used by the tasks. If you have an application that needs more capacity, you can scale-up the service to use more of your container instances (if they are available). If you have unused capacity that you would like to scale-down, you can reduce the number of desired tasks in your service and free up resources.
- In the left navigation pane, click Clusters.
- Click ECSCluster >.
- On the Services tab, select myService
- Click Update then configure:
- Number of Tasks
- Click Next step
- On Step 2, click Next step
- On Step 3, click Next step
- Review the changes and then click Update Service
- Click View Service (The service will add an additional task.)
- Click refresh every 30 seconds until the Running count matches the Desired count.
- Click the Events tab. (You will see an event that an additional instance was registered to myService.)
- Click the Tasks tab. (You should now see three tasks lists.)

Congratulations, you have deployed your first ECS Container, deployed a new version, and scaled it up!
Comments